PS4 Controller Not Connecting? Complete Fix Guide (2026)
Pairing, disconnects, dead ports, and drift from someone who’s resoldered these at the kitchen table
There’s a specific flavor of rage that only a DualShock 4 can produce. You press the PS button, the light bar flashes white a few times, and then… nothing. Just a dead blue strip staring back while the “press the PS button” prompt sits on your TV like it’s judging you. I’ve been elbow-deep in these pads for over a decade testing them, cracking them open, resoldering charging ports at midnight and that flashing-white-then-quit routine is probably the single most common thing people hand me.
Good news: it’s almost always fixable in a couple of minutes. And usually free.
The 60-second version
Flashes white then dies? Reset it (pinhole on the back, paperclip, 5 seconds), then plug in a real data cable and press PS.
Only works wired? That’s a Bluetooth or pairing problem, not a dead controller.
Won’t charge or keeps cutting out? Suspect the micro-USB port or a charge-only cable first.
Drifting sticks? Cleaning buys time. It is not a cure.
If your pad’s flashing white and won’t pair right now, jump straight to the reset section. That fixes it more often than not.
The PS4 Controller Issues You’ll Actually Run Into
Why troubleshoot instead of just buying a new pad? Because a genuine DualShock 4 still runs $45–65, and half the “broken” controllers people have handed me weren’t broken at all they were confused, using the wrong cable, or losing a fight with Bluetooth.
Most PS4 controller issues fall into a handful of buckets: it won’t pair, it keeps dropping out, it won’t charge, or the sticks wander. The pad is well-built, but it has two known weak spots the micro-USB port and stick drift. Knowing which of your problems is a two-minute fix versus a real hardware failure saves you money and a lot of swearing.
PS4 Controller Not Connecting? Start With This 60-Second Check
Not sure if it’s the pairing or the pad itself? Run it through our free gamepad tester first it’ll show you exactly which input is failing.
Before you do anything drastic, run through these three. Half the time they hand you the answer on the spot:
Plug the controller into the PS4 with a USB cable and press the PS button. Does it light up and work wired? If yes, your hardware’s fine this is a pairing problem.
Is that cable a real data cable, or a random charge-only cord from a phone drawer? This trips up more people than you’d believe.
Is the light bar flashing white, glowing a solid color, or doing nothing at all?
Those answers split the whole thing in two. A PS4 controller not connecting over Bluetooth but working perfectly on a cable is almost never dead it just lost its pairing. A pad that won’t even wake up wired is a different, rarer beast.
Let me correct a myth right here, because it changes everything you do next. People assume “not connecting” means the controller failed. In my experience, it’s the connection that failed, not the pad. Most of the time a PS4 controller not connecting is a broken handshake, not broken hardware.
The whole map, on one screen:
| Symptom | Most Likely Cause | First Move |
| Flashes white, won’t pair | Lost or corrupted pairing | Reset the controller and re-pair it using a USB cable. |
| Works wired, not wireless | Bluetooth range or USB 3.0 interference | Move the console, reduce 2.4GHz interference, or stay wired. |
| Won’t charge | Charge-only cable or worn micro-USB port | Use a new data cable first, then inspect the charging port. |
| Stick wanders on its own | Worn analog module (drift) | Clean the analog stick, but expect replacement if the drift persists. |
| Sticky or dead button | Gunk under the button | Clean around the button using 90%+ isopropyl alcohol and a cotton swab. |
| Feels laggy | Bluetooth latency or TV processing | Use a wired connection and enable Game Mode on your TV. |
The Reset That Fixes Most Connection Problems
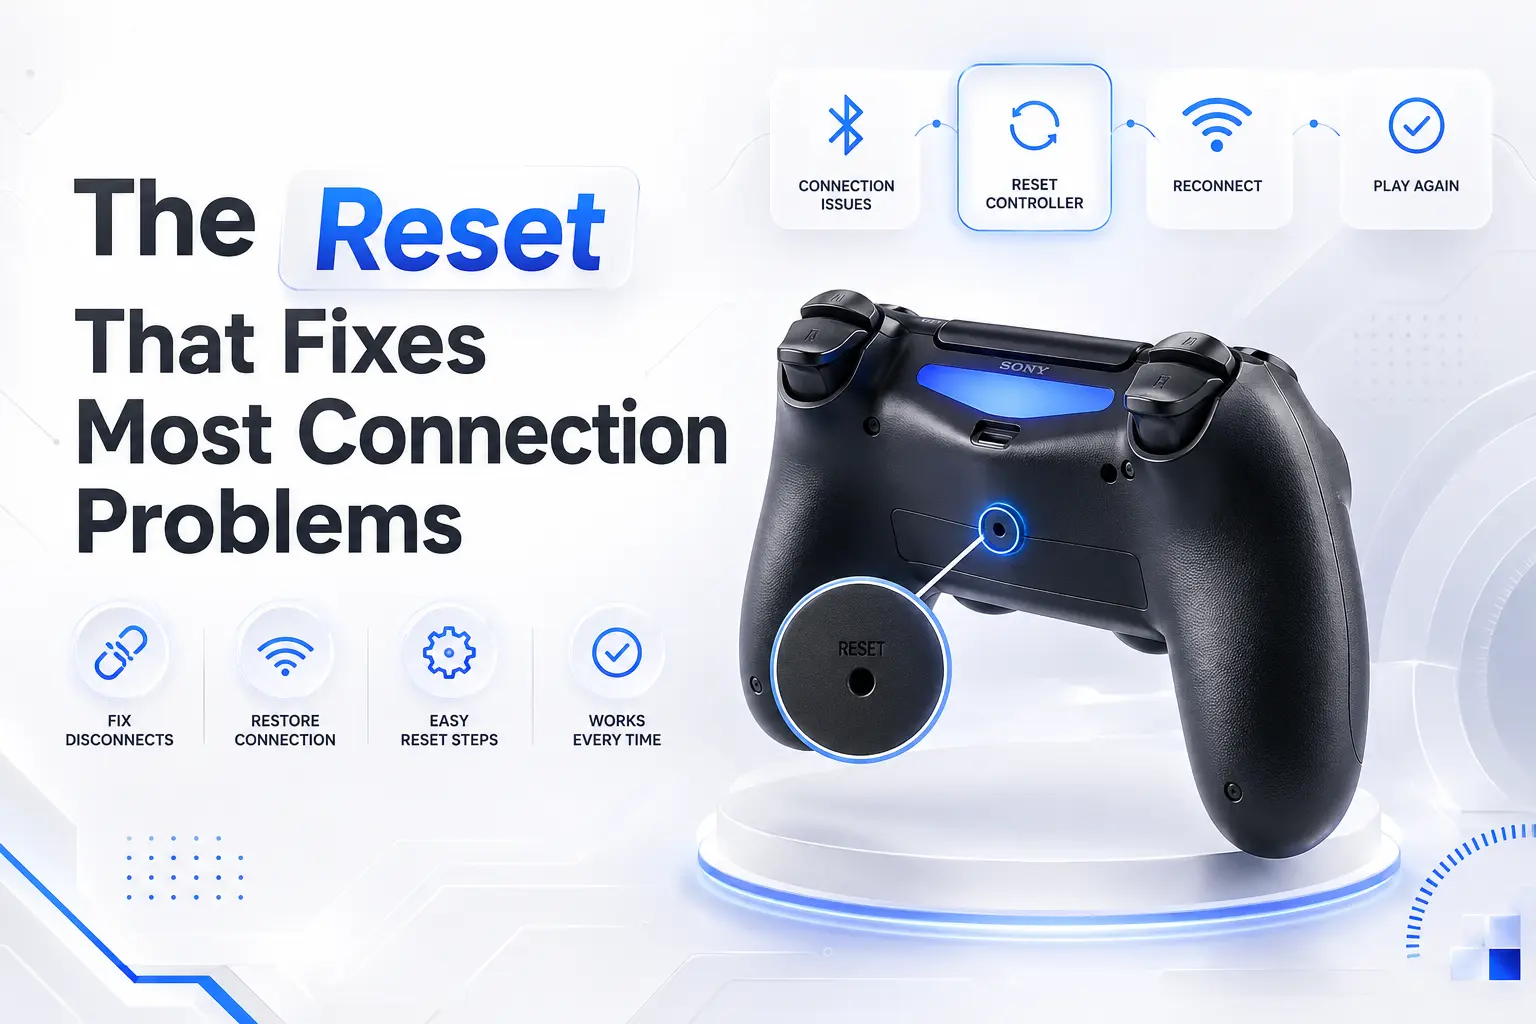
Flip the controller over. Up near the L2 trigger there’s a tiny pinhole genuinely tiny; I’ve watched people run a finger over it and miss it three times. Straighten a paperclip, poke the button inside, and hold for about five seconds. You won’t feel a dramatic click. Just hold and trust it.
Then here’s the step everyone botches: plug the controller into your PS4 with a USB cable and press the PS button. Wired. A reset only “sticks” once you re-pair over the cable. I’ve watched someone reset the pad, immediately jab at Bluetooth again, and declare it dead. It wasn’t. They just skipped the handshake.
Try this right now
Do it even if your controller mostly works. It clears the weird stuff a pad that logs in as player 2, sluggish menus, a light bar stuck on the wrong color. Takes half a minute. I treat it like power-cycling a router.
Why Your Controller Keeps Dropping Out Mid-Game
This is the one that used to make me want to launch a controller through a window. You’re fine for twenty minutes, then it drops. Reconnects. Drops again. Maddening.
The usual suspects, in the order I actually find them:
Distance and interference. The DualShock 4’s Bluetooth is weaker than people think — 15+ feet or a wall in the way and it struggles.
A tired battery. The v1 pads especially sag under load and cut out when the cell ages.
USB 3.0 interference. A sneaky one — 2.4GHz Bluetooth and USB 3.0 ports/hubs genuinely fight each other.
Corrupted pairing, which the reset above clears.
My old apartment kept the PS4 in a media cabinet behind a glass door, and it dropped constantly; moved it to an open shelf and the problem vanished. Quick test: play wired for an hour. If the drops disappear on a cable, you’re chasing Bluetooth, not a dead pad.
When It Won’t Charge the DualShock 4’s Achilles Heel
Here’s my honest, slightly unpopular take: the micro-USB port is the worst thing about this controller. It wears out. The tab inside loosens, the cable wiggles, and eventually it won’t charge unless you hold the cord at one perfect angle like you’re defusing a bomb
Before you assume the port’s dead, swap the cable. Charge-only and frayed micro-USB cords cause a shocking number of “won’t charge or pair” complaints — a proper data cable fixes maybe a third on the spot. If it’s genuinely the port wobbly, charging at only one angle that’s a hardware repair. Solderable if you’re handy (I’ve done dozens), but for most people a repair shop or replacement is the realistic call.
Stick Drift and Dead Buttons
Drift is the other classic failure. Your character wanders, the camera creeps, aim tugs to one side. Pop the rubber cap off, clean around the stick base with a little isopropyl, spray some contact cleaner in there, and it’ll often behave again for a while.
So does cleaning actually fix it? Not for good. The analog module wears out mechanically, and no amount of alcohol rebuilds it. If drift crawls back within weeks, the module needs replacing (about $8 and some soldering) or the pad’s near the end. Mushy or dead face buttons are usually just gunk soda, dust, whatever’s under the cap and the same isopropyl trick brings most of them back.
Where I’d Push Back on the Usual Advice
The internet loves to tell you every PS4 controller problem is a five-minute fix. It isn’t. A worn charging port and long-term stick drift are real hardware failures, and pretending a paperclip cures them just burns your weekend.
Here’s my line in the sand: if a controller has drift that returns within a month AND a flaky charging port, stop nursing it. At that point you’re pouring hours into a $50 part. Buy a new one, or if you love this exact pad, do both repairs at once and be done piecemeal fixes on an old DualShock are a trap.
And skip the cheap third-party pads as replacements. I’ve tested a pile the good ones are rare, the bad ones drift out of the box, and the latency on some is worse than Bluetooth on a real pad. A refurbished official DualShock beats a brand-new knockoff nearly every time.
Your Fix-It Flowchart
Work down this and stop at your first “yes”:
Flashing white, won’t pair? → Reset it, then re-pair wired.
Works wired but not wireless? → Reset, move the console into the open, kill USB 3.0 interference.
Won’t charge? → New data cable first; if still dead, suspect the port.
Stick wandering? → Clean it; if it returns, replace the module or the pad.
Feels laggy? → Go wired, turn on TV Game Mode.
The pre-panic checklist I run every time:
✓ Tried a known-good data cable, not a charge-only one?
✓ Reset the controller and re-paired over USB?
✓ Tested it wired to rule Bluetooth out?Use our controller button test to confirm every input registers cleanly.
✓ Moved the console away from other 2.4GHz gear and USB 3.0 hubs?
✓ Tried it on a second PS4 or a PC to isolate the fault?
Tick all five and it’s still broken? Then it’s the hardware, not you.
Questions I Actually Get Asked
It works on my PC but not my PS4 what’s wrong?
Almost always a pairing problem on the console side. Reset the pad, plug it into the PS4 with a data cable, press PS remember the PS4 pairs over USB the first time.
The light bar flashes white and never connects is it dead?
Usually not. That’s the classic “lost pairing” symptom, and a reset plus a wired re-pair clears the large majority of them.
Can I play while it charges?
Yes wired into the console with a data cable. That’s also the fastest way to tell a Bluetooth problem from a hardware one.
Why does it only disconnect when I’m on the couch?
Distance and line-of-sight. The DualShock 4’s range is modest an open console placement makes a real difference.
Is stick drift covered under warranty?
Within the window, Sony has handled drift claims worth a try before you crack it open. Out of warranty, you’re repairing or replacing.
Still have questions? Visit our Contact Us page, and we’ll be happy to help.
Gaming Musk Team creates gaming tools and practical guides for gamers. We build tools like PC requirement checkers, gamepad testers, and game-specific calculators while publishing easy-to-follow guides for games, gaming hardware, and performance optimization. Our goal is to help players make better gaming decisions with accurate tools and reliable information.
PS5 Controller Not Working? Every Fix I’ve Actually Used
Reset, disconnects, dead buttons, drift, and lag from someone who’s pulled a lot of these apart
The DualSense died on me three bars into a Malenia fight. Not a low-battery warning, not a slow fade just gone. Buttons stopped registering, the light bar blinked orange like it was mocking me, and Malenia did her little waterfowl dance while my character stood there like a mannequin. I’ve since fixed that exact problem more times than I can count, on my own controllers and half the ones friends have shoved across a coffee table at me.
So let me save you the rage. Almost every DualSense problem falls into a handful of buckets, and most of them are fixable in under ten minutes without spending a dime.
The 30-second version
Dead / unresponsive? Reset it. Tiny hole on the back, paperclip, hold 5 seconds, re-pair with a USB cable.
Keeps dropping out? Test wired first, then update firmware, then cut Bluetooth clutter.
Buttons or sticks off? Clean around them. If it’s drift, cleaning buys time — it rarely cures it.
Feels laggy? Go wired, kill background Bluetooth devices, and turn on your TV’s Game Mode.
If your controller is completely unresponsive right this second, skip to the reset section. That alone fixes it most of the time.
Here’s why this is worth ten minutes of your attention: a new DualSense runs about $75, and the Edge is a wallet-crushing $200. Sony doesn’t make replacing these cheap or fun, and stick drift the complaint everybody has has been common enough to spark lawsuits. So before you throw money at a new pad, it pays to know which causes of a PS5 controller not working you can actually fix at home and which mean the pad is cooked.
PS5 Controller Not Working? Start With a 30-Second Diagnosis
Not sure whether the problem is your controller or the console? Test every input with our free Gamepad tester to quickly identify faulty buttons or drifting sticks.
Before you touch anything, answer these three. It’ll stop you from randomly throwing fixes at a problem they don’t apply to:
1. Does the light bar do anything when you press the PS button? Nothing at all points to a power or reset issue; a blink-then-die points to pairing or battery.
2. Does it work over a USB cable but not wirelessly? That usually points to a Bluetooth issue rather than the controller itself. If your controller works over USB but won’t connect wirelessly, check out our PS5 controller not connecting guide for the most common causes and step-by-step fixes.
3. Is it one button or stick, or the whole thing? One means hardware. All of it means connection or firmware.
Hold those answers. If you searched “PS5 controller not working” at 1 a.m. mid-boss-fight, this little map is the fastest way to land on the right fix below
The whole troubleshooting map, on one screen:
| Symptom | Most Likely Cause | Try This First |
| Totally unresponsive | Confused firmware or pairing | Reset the controller and re-pair it using a USB cable. |
| Keeps dropping out | Old firmware or Bluetooth interference | Update the firmware, move closer to the console, or use a wired connection. |
| Stick moves on its own | Worn stick module (drift) | Clean the stick module, but expect that replacement may eventually be needed. |
| Sticky or dead button | Gunk or spill residue | Clean carefully with 90%+ isopropyl alcohol and a cotton swab. |
| Feels delayed / laggy | TV processing or Bluetooth latency | Enable TV Game Mode first, then switch to a wired connection if needed. |
| Won’t charge | Bad cable, charging port, or aged battery | Try another USB cable and charge from the console’s USB port. |
One correction before we go further, because people get this backwards constantly. A dead-seeming controller usually isn’t dead it’s confused. And the fix for a confused controller is almost embarrassingly simple.
The PS5 Controller Reset That Fixes Most Things
Flip the pad over. Near the Sony logo, down by the screw, there’s a tiny pinhole so easy to miss that I’ve had people swear their controller doesn’t have one when it’s right there. Grab an unfolded paperclip or a SIM-ejector tool, push the button inside, and hold it for about five seconds.
Then plug it into your PS5 with a USB-C cable and press the PS button. That last step is the one everybody skips a PS5 controller reset only “takes” once you re-pair it wired. I’ve watched people do the reset, yank the cable immediately, and wonder why nothing changed. Nine times out of ten, that sequence is the end of a PS5 controller not working problem.
Try this right now
Do the reset even if your controller mostly works. It clears a surprising amount of low-grade weirdness random light-bar colors, sluggish menus, a pad that keeps grabbing the wrong profile. Takes 30 seconds. I do it every couple of months, like clearing the cache on a phone.
PS5 Controller Keeps Disconnecting Chase These In Order
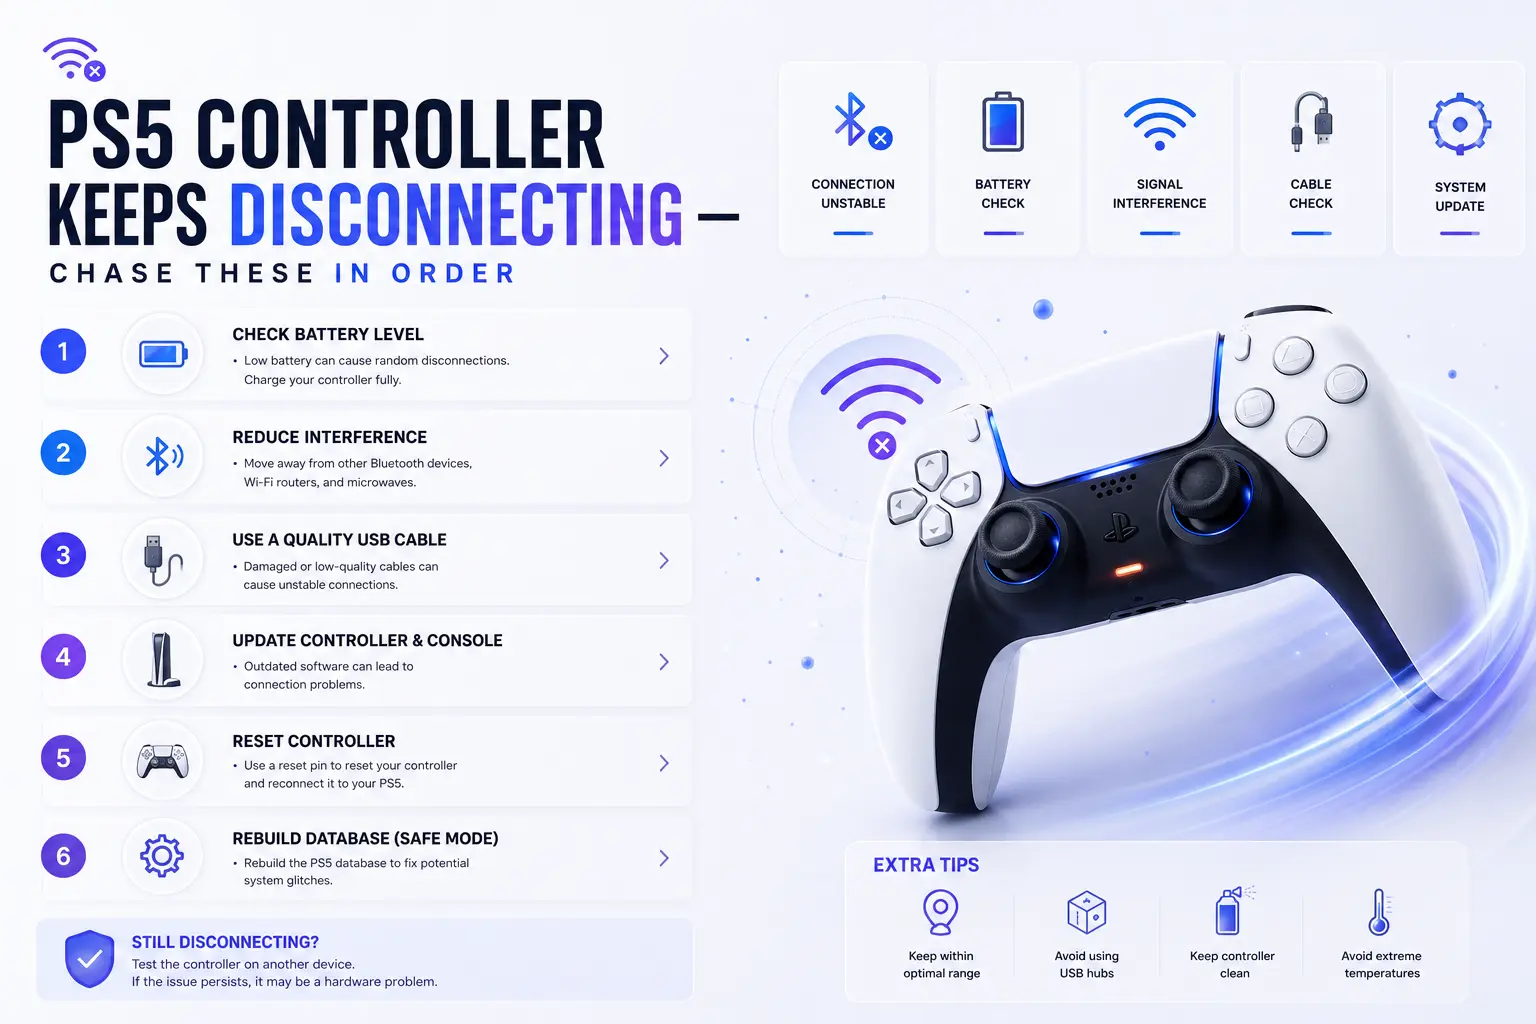
This one drove me up a wall for a solid week before the pattern clicked. If your PS5 controller keeps disconnecting, don’t assume it’s dead the culprit is almost always one of these, ranked by how often I actually see it:
• Old firmware. Update it. Settings › Accessories › Controller (General) › Device Software, done wired.
• Bluetooth interference. The pad uses 2.4GHz, same as your router and microwave. Walls and 10+ feet make drops worse.
• A tired battery. Older DualSense cells can’t hold up under load and cut out.
• A flaky cable or USB port, if you’re playing wired.
Quick test: play wired for an hour. No drops wired but drops wireless? It’s interference or firmware not the controller. Drops even when wired? Now I start worrying about the hardware itself.
PS5 Controller Buttons Not Working Two Very Different Problems
Searches for “PS5 controller buttons not working” usually cover two problems that get treated the same, which is exactly why people waste money on the wrong fix.
If a face button or trigger feels mushy, sticky, or dead, it’s usually gunk skin oil, crumbs, that one soda you don’t remember spilling. A little isopropyl alcohol, 90% or higher, on a cotton swab around the button edges works more often than it has any right to. Start there before you assume anything’s broken.
So does cleaning fix stick drift too? Not really. Drift is a different beast your character strolls off on its own, the camera pans without you, aim tugs to one side. You can blast compressed air in there, work the stick in circles, hit it with electrical-contact cleaner, and it might behave for a while. Be honest with yourself, though: that’s a bandaid. The little potentiometers inside wear down, and no amount of cleaning rebuilds them.
PS5 Controller Input Lag Is Usually Your TV’s Fault
Real talk: most of what people call PS5 controller input lag isn’t the controller at all. It’s the television.
Before you blame the DualSense, switch your TV to Game Mode. Motion smoothing, noise reduction, all those “cinema” processing modes stack real milliseconds between your thumb and the screen. I flipped exactly one setting on a friend’s fancy OLED once and the difference was night and day — he’d been cursing his controller for months.
If it really is the pad, go wired; Bluetooth adds latency, full stop. Then turn off other Bluetooth gadgets fighting for the same airspace, and make sure the firmware’s current. Every competitive player I know runs wired for this exact reason and never looks back.
Where I’d Push Back on the Internet’s Advice
Every forum will tell you drift is fixable. I’ll be the jerk who says: usually, it isn’t not permanently. Cleaning and contact cleaner buy you weeks, maybe a couple of months. If you’re past warranty and the drift keeps crawling back, you’ve really got two honest choices: replace the controller, or if you’re comfortable with a screwdriver and a soldering iron swap the stick module yourself. The parts are about $10. Everything in between is wishful thinking.
The Edge controller has swappable stick modules by design, and that’s the one genuine argument for its silly price. If you burn through pads because of drift, the math works out over a couple of years. Otherwise, skip it.
And one more unpopular opinion: stop buying no-name charging docks that force weird voltages into the battery. I’ve watched more than one DualSense die early because of a cheap dock. Charge off the console or a decent USB-C brick and move on.
Your Fix-It Flowchart
Work down this list and stop at the first “yes”:
• Totally dead or acting possessed? → Reset it (the paperclip method above).
• Works wired but not wireless? → Update firmware, then reduce Bluetooth clutter.
• One button or stick misbehaving? → Clean it. If it’s drift and it returns, replace or re-module.
• Everything feels delayed? → TV Game Mode on, go wired, cut background Bluetooth.
• Did all that and it’s still broken? → It’s hardware. Time to decide: repair or replace.
The pre-panic checklist I run every single time:
✓ Charged above 20%?
✓ Firmware up to date?
✓ Tested with a known-good USB-C cable?
✓ Tried it on a second PS5 or a PC to isolate the problem?
✓ Reset performed and re-paired wired?
Tick all five and it’s still misbehaving? You’re not doing anything wrong the hardware is.
Still not sure what’s wrong? Test your controller with our Gamepad Tester to identify faulty buttons, drifting sticks, or trigger issues before spending money on repairs.
Questions I Actually Get Asked
It works on PC but not my PS5 what gives?
Almost always a pairing or firmware issue on the console side, not a broken pad. Reset it, re-pair wired, update the firmware.
Can I play while it charges?
Yes, over a USB-C cable into the console and that’s also the easiest way to rule Bluetooth out of the picture entirely.
How long should a DualSense battery last?
Realistically 6–12 hours depending on how hard the haptics and light bar are working. If you’re getting two, the battery’s aging.
Is drift covered under warranty?
Within the window, Sony has repaired or replaced for drift file a claim before you try anything invasive. Past that, you’re on your own.
Will resetting delete my stuff?
No. Resetting the controller doesn’t touch your PS5 data or saves. It only clears the pad’s own connection state.
Still have questions? Visit our Contact Us page, and we’ll be happy to help.
Gaming Musk Team creates gaming tools and practical guides for gamers. We build tools like PC requirement checkers, gamepad testers, and game-specific calculators while publishing easy-to-follow guides for games, gaming hardware, and performance optimization. Our goal is to help players make better gaming decisions with accurate tools and reliable information.
Best GPU for 1080p Gaming in 2026: Top Picks Ranked
The first time I understood that “future-proof” is mostly a marketing word, I was up at 3 a.m. watching a frame-time graph spike like a heart monitor. Texture stutter. In a game I’d already finished twice. The card had horsepower to spare it just ran clean out of video memory at the worst possible moment, and no amount of settings-fiddling truly fixed it. That night taught me more about buying graphics cards than any spec sheet ever has.
So let’s skip the marketing. Let’s talk about what actually holds up at 1920×1080 in 2026.
And I’ll say the awkward thing up front: right now is a rough time to buy. Prices are inflated across the board the AI hardware boom plus an ugly memory-price crunch have shoved almost every card up a tier from where it sat a year ago. A card that should be $300 is asking $400 and change. I won’t pretend otherwise. But you can still put together a smooth, high-refresh setup the trick to finding the best GPU for 1080p gaming right now is knowing which cards are worth the price tax and which are quietly ripping you off.
The 10-second version
For most people: NVIDIA RTX 5060, roughly $350–370. Quick, efficient, DLSS 4.5.
Want VRAM headroom: AMD RX 9060 XT 16GB but only near $350, not $460.
On a real budget: RTX 5050, around $260. The cheapest new card I’d still trust.
Hard skip: any 8GB card priced above $350. That’s flagship money for a bottleneck.
If that’s all you needed, go build. If you want the reasoning and the traps keep reading.
Why 1080p Is Still the Smart Play
Everyone online wants to sell you 1440p and 4K. And they’re lovely. But 1080p is still where the value lives, and it isn’t close. At this resolution a mid-range card pushes well past 100 fps in demanding games, which means a $170 144Hz monitor suddenly feels incredible. You’re not paying for pixels you’ll squint to notice from three feet away.
Here’s a quick gut-check before we go further. Answer these three, honestly:
1. What’s your monitor’s refresh rate 60, 144, or 240Hz?
2. Do you play mostly esports (CS2, Valorant, Fortnite) or big AAA single-player games?
3. What’s the real ceiling on your budget not your dream, your ceiling?
Hold those answers in your head. They quietly decide everything below.
The Three Specs That Actually Matter
VRAM. For 1080p, 8GB is the floor in 2026 and it’s a nervous floor. Most games sit at 6–8GB, but a handful of texture-heavy titles blow past it, and when they do you get exactly the stutter I described up top. 12–16GB buys peace of mind.
Upscaling. NVIDIA’s DLSS 4.5 and AMD’s FSR 4 are both mature now, and at 1080p you’re mostly using them to crank frame rates rather than rescue a resolution you can’t run. Worth noting: blind tests in early 2026 had gamers preferring DLSS 4.5 over native rendering. That’s not nothing.
Power. Check your PSU before you check your cart. The rough rule I use: add your GPU and CPU TDP together, multiply by two, and buy a supply at least that big. A 550W unit is the practical minimum for one of these cards. Those three specs are what separate a fine card from the best GPU for 1080p gaming at your budget.
My Picks for the Best GPU for 1080p Gaming

I’ve ordered these loosely by who they’re for, not by a single score because “best” depends entirely on your three answers above.
1. NVIDIA RTX 5060 the one I’d hand most people
This is the default, and I mean that as praise. Blackwell architecture, GDDR7 memory, DLSS 4.5 with Multi Frame Generation, and baseline performance that eats popular titles Fortnite, CS2, Marvel Rivals, Apex for breakfast. Street price hovers around $350–370 thanks to the crunch, though patient shoppers still catch it near $350. The catch is its 8GB of VRAM, which is fine at 1080p today but doesn’t leave much runway.
2. AMD RX 9060 XT 16GB the future-proofer
If you keep cards for years or love maxing textures, this is your card. 16GB of memory means you’ll basically never hit a VRAM wall at 1080p or 1440p, and RDNA 4 closed a lot of AMD’s old ray-tracing gap. It won Tom’s Hardware’s Editor’s Choice, and I get why. My honest hesitation is pricing: it launched at $299, but mid-2026 street prices have drifted to $420–460, which dulls the whole value pitch. Find it near $350 and it’s a no-brainer. At $460 it’s a maybe.
3. RTX 5060 Ti 16GB the one that grows with you
Spend a little more and this card stretches comfortably into 1440p, and it’s the pick if you also do creative work CUDA still wins for local AI, Stable Diffusion, and video editing. Around $400–430. Just do not please buy the 8GB version. It’s nearly the same money for a card that’ll starve itself in modern games.
4. RTX 5050 the honest budget buy
Around $260, 8GB, and it’s the cheapest new card I’d still drop into someone’s build without wincing. It won’t win benchmarks, but it delivers solid native 1080p and beats Intel’s cheaper Arc options even before you turn on upscaling. If your budget is genuinely tight, this over anything used-and-sketchy.
5. AMD RX 7700 XT / RX 7600 XT 16GB last-gen value hunting
Last generation still hides bargains if you shop carefully. The 7600 XT’s 16GB at its old ~$269 was a steal for VRAM-per-dollar; the 7700 XT brings more raw muscle and 12GB, and in pure rasterization it can nose ahead of newer cards. Prices crept up with everything else, so check current numbers but these are worth a look.
6. Intel Arc B580 the wildcard with an asterisk
Intel’s Battlemage cards are cheap and, oddly, among the least affected by 2026’s price chaos. The B580’s 12GB is generous for the money. But I have to be straight with you: driver consistency is still the weak spot. Tom’s Hardware dropped its B570 recommendation after a months-long Unreal Engine 5 lockout broke Fortnite. If you love tinkering and want to save every dollar, tempting. If you just want to click “play,” it’s a gamble.
| GPU | VRAM | Best for | ~Street Price | My Take |
| RTX 5060 | 8GB | Most people | $350–370 | The safe default. It just works. |
| RX 9060 XT 16GB | 16GB | Keeping it for years | $420–460 | Great near $350, a maybe at $460. |
| RTX 5060 Ti 16GB | 16GB | Gaming + Creator Work | $400–430 | Grows into 1440p. Avoid the 8GB one. |
| RTX 5050 | 8GB | Tight budgets | ~$260 | Cheapest new card I’d still trust. |
| RX 7700 / 7600 XT | 12–16GB | VRAM per dollar | Check now | Last-gen bargain hunting. |
| Intel Arc B580 | 12GB | Tinkerers | ~$250 | Cheap, but driver roulette. |
Where I’d Push Back on the Consensus
So does the cheaper card always lose? Not exactly.
The internet has decided 16GB is mandatory and 8GB is dead. That’s oversimplified. If you play mostly esports and popular multiplayer games the stuff that actually dominates play-time charts 8GB genuinely is enough, and the RTX 5060 will feel faster in those titles than a VRAM-heavier AMD card. The 16GB argument matters most if you play texture-heavy AAA games, mod heavily, or plan to keep the card five-plus years. Be honest about which player you are. I chased “future-proofing” once and paid for headroom I never touched.
And here’s my actual spicy take: at today’s inflated prices, a good used last-gen card is often smarter than any new budget card. A used RTX 4060 or 6800 XT can embarrass a new $260 card. The catch is the usual used-market anxiety no warranty, unknown history. Worth it for some, not for everyone.
Which One Is Right for You?
Run yourself down this list and stop at the first line that fits:
• Budget tops out near $260, mostly esports → RTX 5050.
• Want the smoothest all-round experience and $370 is doable → RTX 5060.
• Keep hardware for years or mod textures heavily → RX 9060 XT 16GB (near $350).
• Also edit video or run local AI → RTX 5060 Ti 16GB.
• Love tinkering, want max VRAM-per-dollar → Intel Arc B580, eyes open.
• Prices in your region look insane → seriously consider a used last-gen card.
Try this before you buy
Before choosing the best GPU for 1080p gaming, use Check My PC to identify your current hardware and potential bottlenecks.
Pull up the current street price of your top pick and your second pick, side by side, right now. If the gap is under $40, buy the better card. If it’s over $80, the cheaper one probably wins on value. That single comparison has saved me from more than one impulse purchase.
The pre-purchase checklist I run every time:
✓ PSU has enough wattage and the right connectors
✓ Card physically fits my case measure it (I’ve been burned)
✓ CPU won’t bottleneck it (Ryzen 5 5600 / i5-12600K is the sane floor)
✓ VRAM matches how I actually play, not how I fantasize about playing
✓ I checked used prices before paying new
Questions I Actually Get Asked
Is 8GB of VRAM going to be a problem at 1080p?
For most games, no. For a handful of texture-heavy AAA titles, yes occasional stutter. If you mostly play multiplayer and esports, you’ll be fine.
What CPU should I pair with these?
A Ryzen 5 5600 or Intel i5-12600K is the floor. For 240Hz competitive play, step up to something like a Ryzen 7 7800X3D so the CPU isn’t the bottleneck.
RTX 5060 or RX 9060 XT just settle it
At the same price, RTX 5060 for consistency and popular titles; RX 9060 XT 16GB if you can grab it near $350 and want longevity. The gaming gap between them is under about 5% in most games.
Should I just wait for prices to drop?
Maybe. If your current card still runs your games, waiting out the crunch is reasonable. If you’re building fresh and need it now, buy smart rather than buying the fastest thing on the shelf.
Still have questions? Visit our Contact Us page, and we’ll be happy to help.
Gaming Musk Team creates gaming tools and practical guides for gamers. We build tools like PC requirement checkers, gamepad testers, and game-specific calculators while publishing easy-to-follow guides for games, gaming hardware, and performance optimization. Our goal is to help players make better gaming decisions with accurate tools and reliable information.
Xbox Controller Drift Fix: 9 Proven Methods That Actually Work
The 9 Real Causes — and How I’d Actually Solve Each One
You know the moment. You set the controller down, hands completely off it, and your character starts strolling left like they’ve got somewhere to be. Or the menu highlight keeps creeping upward on its own. That slow, uninvited drift is the single most common way a good Xbox controller starts to die.
Here’s the part nobody tells you up front: “drift” isn’t one problem. It’s about nine different problems that all produce the same annoying symptom, which is exactly why no single Xbox Controller Drift Fix works for every case — the right one depends entirely on which cause you’ve actually got. Cleaning a stick that has a scratched sensor track is like mopping a floor with a hole in it. So before you pop anything open, let’s figure out what you’re really dealing with.
Quick answer (read this first)
Drift showed up suddenly, overnight? Update the controller firmware in the Xbox Accessories app. Free, three minutes, fixes a surprising chunk of sudden-onset cases.
Controller still under a year old? Stop. Don’t open it. Claim the warranty and let Microsoft send you a new one — your time is worth more than a $4 part.
Out of warranty and it’s a dust/gunk issue? Compressed air first, then electronic contact cleaner under the stick. Cheap and effective.
Cleaned it twice and it keeps coming back? The sensor’s worn out. Swap the joystick module (soldering) or — my honest pick — buy a Hall-effect controller and never deal with this again.
One thing to never do: WD-40. I mean it. Keep reading.
Why this keeps happening (the 30-second version)
The standard Xbox thumbstick is a potentiometer—a little wiper arm dragging across a carbon track and translating stick position into a voltage. It’s clever, it’s cheap, and it wears out. Those modules are rated for roughly two million cycles, which sounds enormous until you realize a few months of Call of Duty or Rocket League burns through them fast.
Two things kill sticks. Dust and skin oil work their way under the rubber boot and stop the stick from re-centering cleanly. And the carbon track itself gets physically scratched over time, so the controller reads a signal even when the stick is dead center. That’s it. That’s the whole villain origin story.
Fun-but-annoying fact: Xbox controllers use the same Alps-made joystick modules as PlayStation controllers. So this isn’t a Microsoft-specific curse. It’s an industry-wide design that’s been quietly failing gamers for over a decade. The upside: once you know which of those two failure modes you’re facing, the right Xbox Controller Drift Fix usually takes minutes, not an afternoon.
Try this before you read another word
Plug your controller into a PC and open the Xbox Accessories app (or pull up any browser gamepad tester and watch the on-screen stick dots). Now take your hands completely off it.
Watch where the dots sit. If a stick’s dot rests off-center or wanders on its own, congratulations — you’ve confirmed the drift and pinned down exactly which stick and which direction. While you’re in there, check your firmware version too. You’re about to need both of those facts.
The Xbox Controller Drift Fix for Each of the 9 Causes
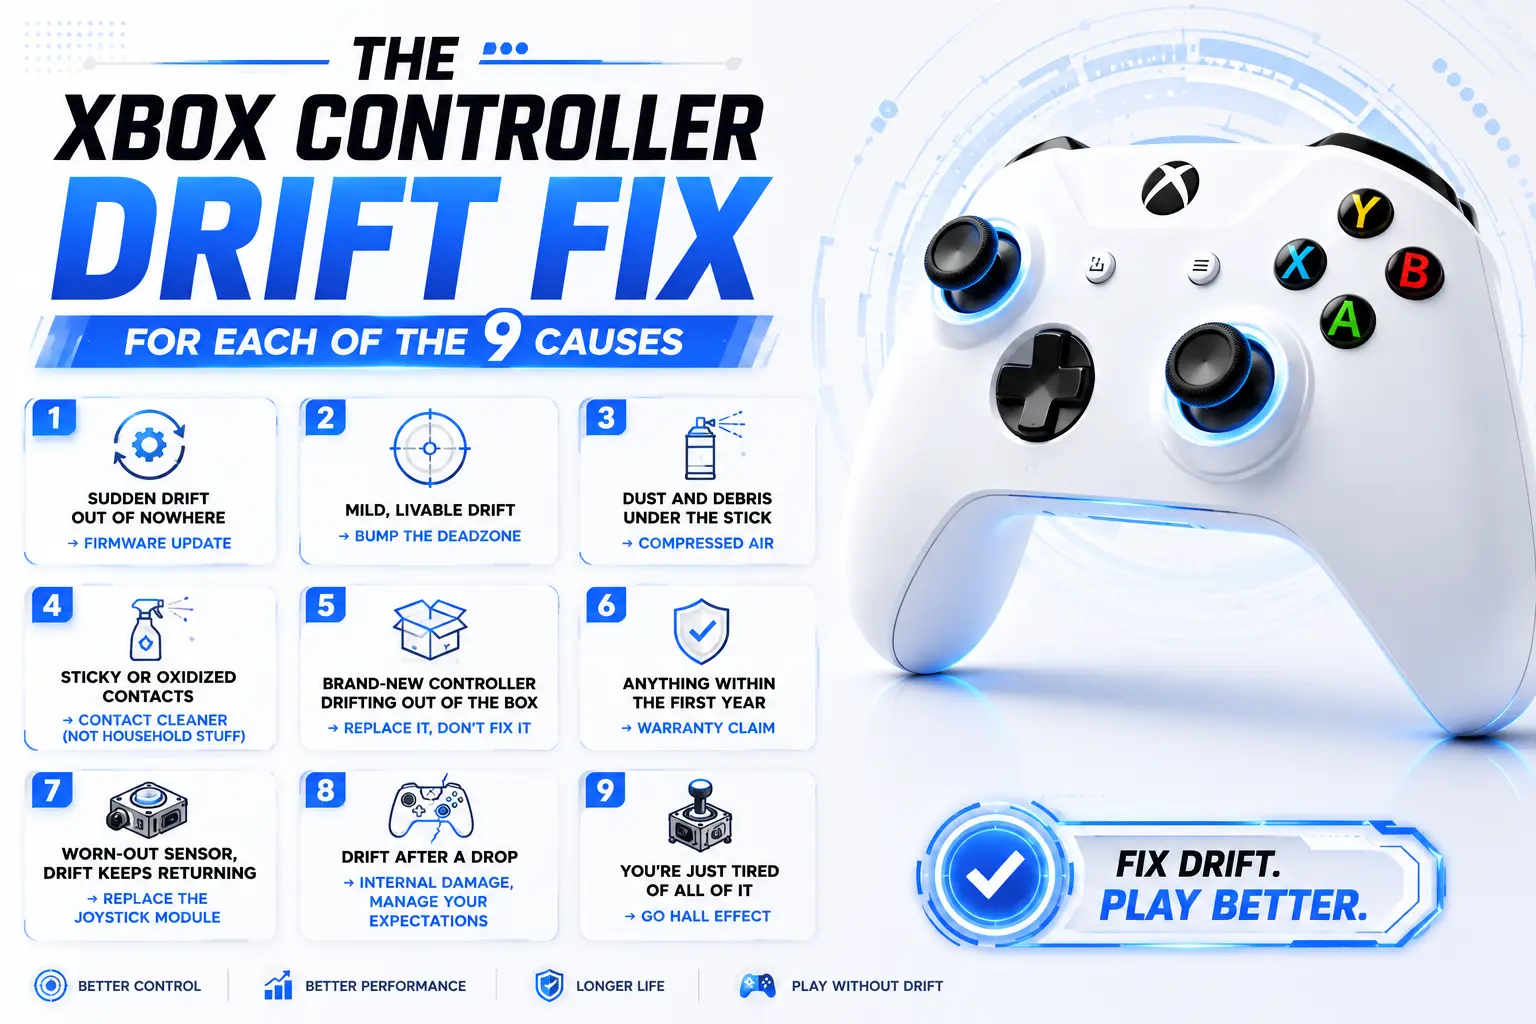
I’ve ordered these from “easiest, try it first” to “okay, we’re committing now.” Don’t skip ahead. Half the people who think they need a soldering iron actually needed a firmware update and a can of air.
1. Sudden drift out of nowhere → firmware update
If your controller was fine yesterday and drifting today, with no gradual buildup, there’s a real chance the cause is software, not worn hardware. Microsoft pushes firmware that adjusts how the controller interprets stick position, and a stale or glitchy calibration can masquerade as drift.
Open the Xbox Accessories app on your console or PC, connect via USB, and install any pending update. Three minutes. It won’t save a physically worn stick — but when drift appears abruptly, it’s the first thing I’d try.
2. Mild, livable drift → bump the deadzone
A deadzone is the little dead space around center where the controller ignores input. Widen it, and small drift gets swallowed before it reaches your game. In the Accessories app, go into the controller’s configuration and nudge the inner deadzone up until the phantom movement stops — usually a few percent does it.
Real talk: this is a band-aid, not a cure. A bigger deadzone means the stick travels further before the game responds, costing you a sliver of precision. Fine for casual play; in ranked, you’ll feel it. Use it to limp a controller to payday, nothing more.
3. Dust and debris under the stick → compressed air
This is the fix that saves the most controllers and takes the least effort. Grab a can of compressed air, aim the straw right at the base of the thumbstick where it meets the housing, and hit it with short bursts while working the stick around in full circles with your other hand. You’re blasting out the grit that’s keeping it from re-centering.
Keep the can upright — tip it and you’ll spray freezing liquid propellant onto the board, which is its own bad day. Cheap, fast, and it revives a shocking number of controllers people had already written off.
4. Sticky or oxidized contacts → contact cleaner (NOT household stuff)
Air didn’t fully do it? The gunk is stickier than dust — skin oil, soda residue, general life. Now you want a proper electronic contact cleaner (DeoxIT and BW-100 are the names to look for) or 99% isopropyl. A few drops at the base of the stick, work it in circles under the boot, then let it dry.
Here’s the mistake I see people make constantly, and it makes me wince every time: reaching for WD-40. Do not use WD-40. It’s not a cleaner, it’s a lubricant, and it leaves an oily film that attracts more dust and can wreck the electrical contact permanently. Household cleaners, same story. Contact cleaner or high-percentage isopropyl. Full stop.
5. Brand-new controller drifting out of the box → replace it, don't fix it
If a controller drifts within days of unboxing, that’s not wear — that’s a factory defect, a module that shipped miscalibrated. Do not clean it. Do not open it. Do not “fix” it.
Return it. If you bought from a retailer, their 30-day return is usually faster than Microsoft’s process, so start there. You paid for a working controller and didn’t get one — that’s the store’s problem, not yours.
6. Anything within the first year → warranty claim
This is the single most under-used Xbox Controller Drift Fix, and it’s completely free. Retail Xbox controllers in the US carry a one-year limited warranty, and Microsoft extended the Elite Series 2 to a full year after a class-action headache over — you guessed it — drift.
If your drift showed up inside that window and there’s no obvious drop damage, go to support.xbox.com, register the serial number, and request a replacement. Microsoft sends a prepaid shipping label and mails you a repaired or new unit, typically in one to three weeks. One catch worth bracing for: if your exact color’s out of stock, you might get a different one back.
So should you always solder your own fix to save money? Not even close. If you’re in warranty, opening the controller to save a $4 part is throwing away a free replacement. Claim it.
7. Worn-out sensor, drift keeps returning → replace the joystick module
Here’s the tell that cleaning will never hold: you clean the stick, it’s perfect for a week, then the exact same drift crawls back. That means the carbon track is scratched, not dirty. Cleaning removes dust; it can’t un-scratch a worn surface.
The permanent DIY fix is swapping the whole joystick module. The parts are dirt cheap — a few dollars — but installation means desoldering and resoldering roughly 14 points per module, so it’s an intermediate soldering job, not a beginner one. If you own an iron and you’re steady, it’s very doable. If you’ve never soldered, don’t learn on your only controller.
8. Drift after a drop → internal damage, manage your expectations
Dropped it on a hard floor and the drift started right after? Different animal. Impact can shift or crack internal parts, and no amount of cleaning or recalibration undoes bent metal. You can open it, look for anything obviously dislodged, and reseat or replace the module — but be honest about whether a standard controller is worth that effort versus just replacing it. Often it isn’t.
9. You're just tired of all of it → go Hall effect
If you’ve fixed drift on the same controller more than once, or you burn through controllers every year, stop patching a broken design. Hall-effect sticks use magnetic sensing instead of a physical wiper on a carbon track — nothing scrapes, so the wear-based drift you’ve been fighting simply can’t happen the same way.
Two paths. You can buy aftermarket Hall-effect modules that are pin-compatible with the Xbox board and solder them in, turning your existing controller drift-proof. Or — and this is what I’d tell most people — just buy a controller that ships with Hall-effect sticks. Officially licensed options like the GameSir G7 SE exist for around the price of a standard pad. It’s the closest thing to a real cure this whole category has.
Which fix is actually right for you?
Did the drift appear suddenly, overnight?
→ Firmware update first (issue 1). Then a deadzone bump (issue 2) if it lingers.
Is the controller less than a year old, no drop damage?
→ Warranty claim (issue 6). A free replacement beats your labor. Don’t overthink it.
Brand new, drifting immediately?
→ Return or replace it (issue 5). It’s defective; that’s not your job to repair.
Out of warranty, drift comes and goes?
→ Compressed air, then contact cleaner (issues 3–4). Give cleaning exactly one honest shot.
Cleaned it already and it came back?
→ The track’s worn. Module swap if you can solder (issue 7); Hall-effect controller if you can’t (issue 9).
Sick of doing this every single year?
→ Hall effect. Stop feeding the cycle (issue 9).
Is the controller less than a year old, no drop damage?
→ Warranty claim (issue 6). A free replacement beats your labor. Don’t overthink it.
Brand new, drifting immediately?
→ Return or replace it (issue 5). It’s defective; that’s not your job to repair.
Out of warranty, drift comes and goes?
→ Compressed air, then contact cleaner (issues 3–4). Give cleaning exactly one honest shot.
Cleaned it already and it came back?
→ The track’s worn. Module swap if you can solder (issue 7); Hall-effect controller if you can’t (issue 9).
Sick of doing this every single year?
→ Hall effect. Stop feeding the cycle (issue 9).
Fix-at-a-glance
| Fix | Cost | Difficulty | What it actually fixes | Permanent? |
|---|---|---|---|---|
| Firmware update | Free | Easy (3 min) | Sudden, software-side drift | Sometimes |
| Deadzone increase | Free | Easy | Masks mild drift | No — band-aid |
| Compressed air | ~$8 | Easy | Dust under the stick | Weeks–months |
| Contact cleaner / 99% IPA | ~$10 | Medium | Sticky, oxidized contacts | Months |
| Warranty replacement | Free | Easy* | Anything, in the first year | Yes (new unit) |
| Joystick module swap | ~$5 part | Hard (solder) | Worn / scratched sensor | Until it wears again |
| Hall-effect module | ~$20 | Hard (solder) | Everything — drift-proof | Yes |
| New Hall-effect controller | ~$40+ | None | Everything — drift-proof | Yes |
* Easy only if you’re inside the one-year window.
Where I'd push back on the usual advice
A few things the tutorials gloss over — because not every Xbox Controller Drift Fix you’ll read about online actually holds up.
“Just recalibrate it” is oversold. Xbox doesn’t hand you a full stick-recalibration wizard the way PlayStation does. What you’ve actually got is firmware updates and deadzone adjustment. Both help specific cases. Neither one regrows a worn carbon track, and it’s frustrating to watch people cycle through software settings for an hour on a stick that’s physically done.
Soldering your own module is real, but respect it. The part is cheap; the skill isn’t. Fourteen-ish points on a dense board, and one lifted pad or bridged connection turns a drifting controller into a dead one. Practice on something you don’t care about first. I’m not gatekeeping — I just don’t want you learning on your main pad.
The right-to-repair sticker thing. In the US, “warranty void if removed” stickers aren’t legally enforceable — opening the shell doesn’t automatically void your coverage. But that only matters out of warranty. If you’re still inside the window, the smart move isn’t to invoke your repair rights; it’s to make Microsoft ship you a new one for free.
Hall effect isn’t literally immortal. It kills the carbon-wear failure mode behind most drift, which is huge — but bumpers, triggers, and batteries still age. Buy it because it solves this problem, not because it’s a magic forever-pad.
A 60-second pre-flight checklist
Before you spend a dollar or pick up a tool, tick these off:
☐ I ran a gamepad test and confirmed which stick and which direction is drifting
☐ I checked whether the controller is still under its one-year warranty
☐ I updated the firmware in the Xbox Accessories app (free, first thing)
☐ I know whether the drift came on suddenly (lean software) or gradually (lean hardware)
☐ If it’s brand new, I’m returning it, not repairing it
☐ I have contact cleaner or 99% isopropyl on hand — and specifically not WD-40
☐ If I’m soldering, I’ve accepted the risk and I’m not learning on my only controller
FAQ
Does updating the firmware really fix drift, or is that a myth?
For sudden-onset drift, it genuinely helps a meaningful share of cases — the controller was mis-reading center, and the update corrects that. For drift that crept in gradually over months, firmware won’t save you; the problem is physical wear. But it’s free and takes three minutes, so always rule it out first.
Will bumping up the deadzone hurt my aim?
Yes, a little, and you should know that going in. A wider deadzone means the stick travels further before your game registers input, which slightly dulls precision and response. It’s a fair trade to keep a controller usable, but it’s a compromise, not a repair.
Can I just use the rubbing alcohol from my bathroom cabinet?
The 70% stuff will work in a pinch, but it’s mostly water and dries slower and dirtier. Spring for 99% isopropyl or a proper electronic contact cleaner — it flushes the contacts and evaporates clean, which is the entire point.
Is WD-40 ever okay, even a tiny bit?
No. Never. It’s a lubricant, not a cleaner; it leaves an oily residue that attracts dust and can permanently foul the contacts. If someone in a forum swears it fixed theirs, they’ve just delayed a worse failure.
My Elite Series 2 drifts — is it any different from a standard controller?
Same joystick modules, same failure mode, so the same fixes apply. The one difference in your favor: Microsoft extended Elite Series 2 warranty coverage to a full year after drift complaints, so check your purchase date before assuming you’re out of luck.
How long should an Xbox controller realistically last?
For heavy players, plan for drift somewhere in the one-to-two-year range on standard sticks — that’s just the nature of the potentiometer design. Lighter use stretches it out. If that lifespan annoys you as much as it annoys me, that’s the argument for Hall effect in a nutshell.
Are Hall-effect sticks actually drift-proof forever?
They’re immune to the carbon-track wear that causes the common drift you’re fighting, because nothing physically scrapes. That’s the big win. They’re not indestructible overall — but the specific problem that brought you to this article? Gone.
Yes, a little, and you should know that going in. A wider deadzone means the stick travels further before your game registers input, which slightly dulls precision and response. It’s a fair trade to keep a controller usable, but it’s a compromise, not a repair.
The 70% stuff will work in a pinch, but it’s mostly water and dries slower and dirtier. Spring for 99% isopropyl or a proper electronic contact cleaner it flushes the contacts and evaporates cleanly , which is the entire point.
No. Never. It’s a lubricant, not a cleaner; it leaves an oily residue that attracts dust and can permanently foul the contacts. If someone in a forum swears it fixed theirs, they’ve just delayed a worse failure.
Same joystick modules, same failure mode, so the same fixes apply. The one difference in your favor: Microsoft extended Elite Series 2 warranty coverage to a full year after drift complaints, so check your purchase date before assuming you’re out of luck.
They’re immune to the carbon-track wear that causes the common drift you’re fighting, because nothing physically scrapes. That’s the big win. They’re not indestructible overall but the specific problem that brought you to this article? Gone.
What I'd actually do
If I handed this to a friend, the whole decision fits in a breath: In warranty? Claim it. New out of the box? Return it. Out of warranty with a dust problem? One round of air and contact cleaner, and if the drift crawls back within a week or two, quit cleaning — the sensor’s scratched and you’re just delaying the inevitable.
And if you’ve been through this dance more than once on the same pad, I’d stop being stubborn about it. The only permanent Xbox Controller Drift Fix worth betting on long-term is Hall effect — swap in the modules yourself if you like soldering, or spend forty-ish bucks on a controller that ships with them and be done. There’s a point where fixing the same drift over and over isn’t thriftiness — it’s choosing to keep the problem. Don’t. Go play something.
Gaming Musk Team creates gaming tools and practical guides for gamers. We build tools like PC requirement checkers, gamepad testers, and game-specific calculators while publishing easy-to-follow guides for games, gaming hardware, and performance optimization. Our goal is to help players make better gaming decisions with accurate tools and reliable information.
Best Intel CPU for Gaming Guide: Top Picks & Benchmarks 2026
A year ago, if you’d asked me about the Best Intel CPU for Gaming, I’d have made a face. The kind of face you make when a friend asks you to help them move on a Saturday. Arrow Lake had landed in late 2024 with a thud—interesting on paper, disappointing in games, and stuck on a socket going nowhere. For most of 2025, the honest Intel answer was, “Buy AMD.”
Then March 26, 2026 happened. Intel dropped the Arrow Lake Refresh—the “Plus” chips—and quietly fixed most of what was wrong. Not all of it, but enough that I have to eat some of my earlier skepticism.
So, if you’re wondering which is the Best Intel CPU for Gaming in 2026, let’s get you the real answer first, and then we’ll dig into why.
Best Intel CPU for Gaming (10-second version)
If you mostly game and nothing else: buy the AMD Ryzen 7 9800X3D. I know that’s not the Intel answer you searched for. Read the next line before you close the tab.
The best Intel gaming CPU right now: the Core Ultra 7 270K Plus (~$299). It’s the fastest gaming chip Intel makes, and it demolishes anything near its price in editing, rendering, and streaming.
Best budget Intel pick: the Core Ultra 5 250K Plus (~$199). Punches absurdly far above its price.
Do NOT buy: the Core Ultra 9 285K. The cheaper 270K Plus matches or beats it. More on that below.
The trap nobody warns you about
I’ve watched this category for a long time, and the same mistake shows up over and over: people pour money into the CPU and starve the GPU.
Here’s the thing that should change how you shop. In most games, at most resolutions, your graphics card decides your frame rate not your processor. The CPU only becomes the bottleneck in specific situations: competitive shooters at 1080p where you’re chasing 240+ fps, heavy strategy and simulation games (think Total War, Cities: Skylines, big Factorio saves), and anything with dense NPC logic or physics.
Push the resolution up to 1440p or 4K and the gap between a $200 CPU and a $500 CPU often shrinks to almost nothing, because now the GPU is the one sweating. So before you spend a dime, a gut-check.
Try this right now: Look up what resolution and refresh rate your monitor actually runs. Then ask yourself honestly whether you play twitchy competitive games or slower, prettier ones. Those two facts matter more than any spec sheet. If you’re a 4K single-player person, you can spend less on the CPU than a review site’s “best gaming chip” headline implies, and put the difference toward your graphics card.
The 2026 Intel gaming lineup, ranked by who should buy it

Core Ultra 7 270K Plus the one I'd actually recommend
This is the chip that made me rewrite my opinion. It’s a 24-core part (8 performance cores, 16 efficiency cores) that boosts to 5.5 GHz, and here’s the sneaky part: it uses the full silicon die that Intel previously reserved for the $440+ flagship. Intel took its best die, added cores, and dropped the price to $299. That doesn’t happen often.
What actually changed under the hood matters more than the core count. Intel bumped the internal die-to-die interconnect frequency by 900 MHz, which was the single biggest thing dragging original Arrow Lake down in games chips talking to themselves too slowly. It also now runs DDR5-7200 memory as an official spec instead of fighting you for it.
In gaming, independent testing puts it around 206 fps average at 1080p medium across a broad suite basically dead even with Intel’s old 14900K flagship, and a few percent ahead of AMD’s similarly priced Ryzen 7 9700X, with noticeably better 1% lows (the stutters you actually feel). In heavily multi-threaded work, it’s not close: reviewers measured it roughly 65% faster than AMD’s gaming-focused X3D chips in Cinebench and Blender.
Translation: if you game and you edit video, stream, compile code, or render 3D, this is the smartest chip on the market at the price. Full stop.
Core Ultra 5 250K Plus the budget star
Same refresh treatment, smaller wallet. Eighteen cores (6P + 12E) for around $199, and it embarrasses AMD’s similarly priced Ryzen 5 9600X in anything multi-threaded reviewers clocked it something like 85% faster in Cinebench multi-core at the same price. In pure gaming the two trade blows within a few percent, and at 1440p the difference vanishes into GPU-bottleneck territory anyway.
If you’re building a value gaming rig and you want to stay on Intel, this is the one. There’s also a 250KF variant that drops the integrated graphics for a few bucks less fine if you’re pairing it with a discrete GPU, which you are.
Core Ultra 9 285K skip it
I’ll be blunt. This was Intel’s flagship, it still sells for $400-plus, and the $299 270K Plus matches or beats it in almost everything including up to 12% faster in some tasks. Paying more for less is a bad trade. Unless you find one deeply discounted below the 270K Plus, walk past it.
The LGA 1700 escape hatch (Core i5-14600K / i7-14700K)
Different situation: you already own a 12th or 13th Gen Intel board and just want a drop-in bump without rebuilding the whole machine. The Core i5-14600K and i7-14700K are still genuinely good gaming chips and let you keep your existing motherboard and DDR memory. Just make sure your BIOS is fully updated — the earlier instability drama on these chips was addressed through microcode fixes, and you want those applied.
Which one is right for you? (Follow the arrows)
Start here: Do you only play games and never touch creative or heavy background work?
Yes, only gaming → Honestly? Buy the AMD Ryzen 7 9800X3D. Come back to Intel CPU next generation. If you’re set on Intel for other reasons, jump to the next question.
No, I also stream / edit / render / multitask hard → Keep going.
How much are you spending on the CPU?
Around $200 or less → Core Ultra 5 250K Plus. Done.
Around $300 → Core Ultra 7 270K Plus. This is the sweet spot.
“Money’s no object, I want the fastest Intel” → Still the 270K Plus. The pricier 285K isn’t worth it. Spend the savings on your GPU or RAM.
Already own an LGA 1700 (12th/13th Gen) board?
Yes → A Core i7-14700K upgrade keeps your platform and saves real money. Update your BIOS first.
At-a-glance comparison
| Chip | Price | Cores (P+E) | Gaming vs. AMD’s Best | Buy it if… |
| Core Ultra 7 270K Plus | ~$299 | 8P + 16E (24) | ~12–20% behind 9800X3D at 1080p; ties it at 1440p+ | You game and create/stream — the do-everything pick. |
| Core Ultra 5 250K Plus | ~$199 | 6P + 12E (18) | Within a few % of a Ryzen 5 in games. | You want the best Intel value under $200. |
| Core Ultra 9 285K | ~$400+ | 8P + 16E (24) | Same ballpark as 270K Plus, costs more. | Basically never. Get the 270K Plus instead. |
| Core i7-14700K (LGA 1700) | ~$280 | 8P + 12E (20) | Solid performer but trails the current generation. | You already own an LGA 1700 motherboard and don’t want to rebuild. |
Where I'd push back on the hype
A few things the enthusiastic reviews sometimes gloss over.
The socket is a dead end, and that’s real. LGA 1851 the socket these Plus chips use has no future. Intel’s genuinely next-generation architecture, Nova Lake (the Core Ultra 400 series), is coming later in 2026 on a brand-new socket. So if you buy a Z890 board today, the 270K Plus is likely the last CPU you’ll ever drop into it. For someone who loves buying one motherboard and upgrading the chip three times over five years, that’s a dealbreaker, and AMD’s long-lived AM5 platform is the better home. For everyone else the vast majority who keep a CPU for four to six years and then rebuild the whole thing anyway — it’s a shrug. Know which person you are.
“Efficient” is not the word for these. Intel got the performance back by throwing power at the problem. Under full load the 270K Plus can pull up to 250W, same as the old flagship. It’ll want a real cooler. AMD’s X3D chips run dramatically cooler and quieter for gaming, and that has downstream costs — beefier cooler, hotter case, bigger power supply. Factor it into the total build price, not just the CPU sticker.
IBOT is promising, not magic. Intel’s new Binary Optimization Tool (you’ll see it as IBOT) reworks a game’s code on the fly to run better on the chip. When a game supports it, it helps. Support is limited today. Treat it as a nice bonus, not a reason to buy.
So does that mean AMD just wins and you should ignore all of this? Not exactly. If your PC does more than run games and most do Intel’s multi-threaded value at $199 and $299 right now is genuinely hard to argue with. That’s the honest tension, and anyone who tells you one brand wins cleanly in 2026 is selling something.
A 30-second self-assessment before you buy
Tick these off in your head:
☐ I know my monitor’s real resolution and refresh rate (not what I think I bought)
☐ I’ve decided honestly whether I’m a competitive-shooter person or a pretty-single-player person
☐ I’ve budgeted the GPU first and the CPU second
☐ I’ve accepted that if I only game, the Intel answer might not be the best answer — and I’m okay choosing Intel anyway for my own reasons
☐ I’ve priced in a decent cooler for a chip that can pull 250W
☐ I’ve made peace with LGA 1851 being a last-stop socket
If most of those are checked, you’re buying with your eyes open. That’s the whole goal.
Frequently Asked Questions
Is the Core Ultra 7 270K Plus better than the Ryzen 7 9800X3D for gaming?
No the 9800X3D is still faster in pure gaming, sometimes by a lot at 1080p, thanks to its stacked cache. But the 270K Plus costs meaningfully less, closes the gap at higher resolutions, and buries the AMD chip in creative and multi-threaded work. If you only game, AMD. If you do more, Intel’s the smarter spend.
Should I wait for Nova Lake?
If you can comfortably wait until late 2026 and you want the newest architecture on a socket with an actual future, waiting is reasonable. If you need a machine now, the 270K Plus is a great chip today don’t leave your PC in pieces for six months chasing a launch that could slip or arrive pricey.
Is the 285K ever worth buying over the 270K Plus?
Only if you find it discounted below the 270K Plus, which does happen occasionally. At list price, no. Same die, more money, no real gaming advantage.
Do I need the 8-core P / 16 E-core monster for gaming?
No. Games lean on the performance cores and rarely use more than eight of them well. The extra efficiency cores are for everything around gaming — streaming, background apps, rendering. If you truly only game, you’re paying for cores you won’t use, which is exactly why the pure-gaming crowd is better off elsewhere.
Will these work in my current Intel motherboard?
Only if it’s an 800-series (LGA 1851) board with an updated BIOS. They will not drop into older LGA 1700 boards. If you’re on 12th/13th Gen, your in-place upgrade path is a 14th Gen chip, not a Plus chip.
Is integrated graphics worth having?
For a gaming build with a discrete card, barely — it’s a nice troubleshooting fallback if your GPU dies. If you’re pairing with a real graphics card and want to save a little, the KF variant that drops the iGPU is fine.
Still have questions? Visit our Contact Us page, and we’ll be happy to help.
Gaming Musk Team creates gaming tools and practical guides for gamers. We build tools like PC requirement checkers, gamepad testers, and game-specific calculators while publishing easy-to-follow guides for games, gaming hardware, and performance optimization. Our goal is to help players make better gaming decisions with accurate tools and reliable information.
Palworld Anubis Best Skills: Combat, Work and Passive Guide
Anubis is the rare Pal that does two jobs better than most Pals do one. It carries the highest base Handiwork suitability in the game, Level 4, while simultaneously functioning as a top-tier Ground combat partner. If you’re searching for Palworld Anubis best skills, understanding how to optimize separate builds is essential. Most endgame players keep two: one stationed at the Handiwork bench with work-speed passives, and one in the party with attack passives. This guide covers every work skill, combat move, and passive combination—and tells you exactly which to prioritize.
Anubis Skills Overview
| Field | Details |
| Pal Number | #100 |
| Element | Ground |
| Partner Skill | Guardian of the Desert — grants Ground damage to player attacks; enables high-speed sidestep in battle |
| Work Suitability | Handiwork Lv. 4 · Mining Lv. 3 · Transporting Lv. 2 |
| Base Attack | 120 (at Lv. 50) |
| Base Defense | 100 (at Lv. 50) |
| HP | High — suited for frontline combat and base defense raids |
| Speed | Above average — makes it effective at Transporting tasks |
| Weakness | Grass element |
| Strong Against | Electric element (ideal vs Grizzbolt tower boss) |
| Where to Get | Alpha Boss: Twilight Dunes (-134, -95) · Breeding: Vanwyrm + Cinnamoth (easiest) · Huge Rocky Egg |
Three high-level work suitabilities on a single Pal is unusual. Most base-focused Pals sacrifice combat viability entirely. Anubis sacrifices nothing — its 120 base Attack at Level 50 keeps it competitive in endgame encounters.
Palworld Anubis Best Skills For Work
Work suitability determines how efficiently a Pal performs each task type. Higher level = faster completion and less stamina drain. The character Anubis covers three work types, which means a single Anubis can handle your most demanding base tasks without requiring you to dedicate multiple slots to specialised workers.
| Work Type | Suitability | Efficiency | Notes |
| Handiwork | Lv. 4 | S-Tier | Highest base level of any Pal in the game. Handles all crafting bench tasks at maximum speed. Upgradeable to Lv. 5 via condensing. |
| Mining | Lv. 3 | A-Tier | Excellent at Ore Nodes, Coal Deposits, and Quartz. Assign to Stone Pit or ore-rich outdoor bases for constant resource yield. |
| Transporting | Lv. 2 | B-Tier | Moves items between workstations and chests efficiently. Anubis’s above-average movement speed makes Lv. 2 punch above its weight class. |
Handiwork Skill Explained
Handiwork is Anubis’s defining work trait. Level 4 is the base cap no other Pal in the game starts higher. It applies to every crafting bench, the Weapon Workbench, and the Production Assembly Lines. When you assign Anubis to a Handiwork station, it completes jobs significantly faster than a Level 3 Pal like Cattiva or Lifmunk.
Condensing tip: Running four copies of Anubis through the Pal Condenser unlocks Lv. 5 Handiwork the only way to exceed the base cap. Combined with Artisan passive, this creates the fastest crafter in the game.
Mining Skill Explained
Level 3 Mining makes Anubis one of the best ore farmers outside of dedicated Mining Pals like Digtoise. Position it near natural Ore Nodes at your base and it will chip away automatically. Stacking the Lucky or Work Slave passive further accelerates ore output per hour.
Top Combat Moves Ranked
Anubis learns five unique exclusive skills and shares access to Sand Tornado and Rock Lance. Its combat identity is area-of-effect Ground damage — most of its best moves hit wide zones rather than single targets, making it excellent against groups and Tower Boss encounters with adds.
Use our Palworld Calculator to breed an Anubis with the ideal work passives for maximum efficiency.
Best Combat Skills for Anubis
| Move | Type | Unlock Lv. | Power | Cooldown | Description |
| Sand Tornado | Ground | Lv. 1 (default) | 80 | Short | Generates two sand tornadoes. Best crowd control move — fast recharge, hits multiple targets. |
| Spinning Roundhouse | Ground | Lv. 22 (exclusive) | 100 | Medium | Wide-arc spin kick hitting all nearby enemies. Essential for group fights. |
| Forceful Charge | Ground | Lv. 30 (exclusive) | 120 | Medium | High-speed pursuit with energy damage and a powerful punch. Effective on single targets but can miss if terrain is uneven. |
| Ground Smash | Ground | Lv. 40 (exclusive) | 150 | Medium-Long | Leaps into air and punches the ground — wide AoE shockwave. Strong damage but long animation means it pairs poorly with Rock Lance on the same build. |
| Rock Lance | Ground | Lv. 50 (shared) | 150+ | Very Long | Highest raw power of any Ground active skill. Launches enemies into air. Long cooldown — do not pair with Ground Smash. |
Best combat rotation: Sand Tornado (opener, crowd control) → Spinning Roundhouse (AoE follow-up) → Rock Lance (finisher, single high-value target). Replace Rock Lance with Ground Smash for closer-range fights with many enemies.
Because Anubis is Ground-type, all three of these move types get a same-type attack bonus (STAB) against Electric enemies ideal against Zoe & Grizzbolt’s Tower.
Best Passive Skills for Anubis
| Passive Skill | Effect | Best For | Rating | Notes |
| Artisan | +50% Work Speed | Work Build | S-Tier | Single best passive for any base Pal. Stack with Lucky. |
| Work Slave | +30% Work Speed | Work Build | A-Tier | Outperforms Lucky for pure work speed; no combat benefit. |
| Lucky | +15% Work Speed, +15% Attack | Hybrid | A-Tier | Useful in both builds — great if you only want one Anubis. |
| Legend | +20% Attack, +20% Def, +15% Speed | Combat/Work | S-Tier | Only available on Alpha/Lucky Pals; must be bred in. |
| Musclehead | +30% Attack, -50% Work Speed | Combat Only | S-Tier | Never assign to base — cripples Handiwork completely. |
| Ferocious | +20% Attack | Combat | A-Tier | Solid fallback if Musclehead isn’t available. |
| Swift | +30% Movement Speed | Work/Combat | A-Tier | Improves Transporting speed and combat mobility. |
| Runner | +20% Movement Speed | Work | B-Tier | Budget option while farming for Swift. |
| Serious | +20% Work Speed | Work | B-Tier | Weaker than Work Slave but usable while breeding up. |
| Earth Emperor | +20% Ground damage | Combat | A-Tier | Multiplies damage on top of other bonuses — better than Ferocious when stacking multiple attack passives. |
| Demon God | +30% Attack | Combat | S-Tier | Strongest flat attack passive in the game when combined with Musclehead. |
| Serenity | +10% Attack, -10% Crafting Speed | Combat | A-Tier | Minor work penalty negligible on a dedicated combat Anubis. |
Best Passive Combos for Work Builds
Recommended Work Build: Artisan + Work Slave + Lucky + Swift Result: +95% Work Speed, +15% Attack (for raid defense), +45% Move Speed for Transporting. This is the consensus endgame base build.
If you cannot yet breed Artisan, the budget path is: Work Slave + Serious + Lucky + Swift still a strong performer while you grind the ideal combination.
Note: Musclehead CANNOT be on a work Anubis. It cuts Work Speed by 50%, completely negating Artisan and making Handiwork slower than a Level 2 Handiwork Pal.
Best Passive Combos for Combat Builds
Recommended Combat Build: Musclehead + Legend + Demon God + Earth Emperor Result: Maximizes Ground damage through multiplicative stacking. Replaces Demon God with Ferocious if unavailable.
The math matters here: Earth Emperor multiplies your total damage after other bonuses are applied. With Musclehead (+30%), Demon God (+30%), and Legend (+20%), adding Earth Emperor at ×1.20 provides a larger bonus than replacing it with another flat percentage booster like Ferocious (+20%).
Anubis Skill Tier List
| Tier | Skill | Type | Why It Ranks Here |
| S | Artisan | Passive — Work | +50% Work Speed. No other passive comes close for base efficiency. Non-negotiable on work builds. |
| S | Musclehead | Passive — Combat | +30% Attack at cost of work speed. The highest single attack passive — essential for combat Anubis. |
| S | Legend | Passive — Hybrid | +20% Atk/Def/Speed combined. Hardest to obtain but transforms any build. Breed-only. |
| S | Demon God | Passive — Combat | +30% Attack flat. Pairs with Musclehead for maximum damage output. |
| A | Work Slave | Passive — Work | +30% Work Speed. Best option below Artisan. No downsides. |
| A | Earth Emperor | Passive — Combat | +20% Ground damage as a multiplier. Outperforms Ferocious when stacking other attack boosts. |
| A | Lucky | Passive — Hybrid | +15% Work Speed, +15% Attack. Best single passive if running only one Anubis for both roles. |
| A | Swift | Passive — Work/Combat | +30% Speed. Boosts Transporting efficiency and combat maneuverability simultaneously. |
| A | Sand Tornado | Active — Combat | Best crowd control move. Short cooldown, reliable hit on multiple targets. Core slot on any combat build. |
| A | Spinning Roundhouse | Active — Combat | Wide AoE exclusive skill. Consistently strong against groups. Unlocks at Lv. 22. |
| B | Rock Lance | Active — Combat | Highest power but very long cooldown. Use as a finisher, never alongside Ground Smash. |
| B | Forceful Charge | Active — Combat | Good single-target damage but terrain-dependent reliability issues drop it out of S-tier. |
| B | Ferocious | Passive — Combat | +20% Attack. Reliable fallback. Outclassed by Demon God but easier to breed. |
| C | Ground Smash | Active — Combat | Strong AoE but long animation and cooldown overlap with Rock Lance makes it situational only. |
| C | Runner | Passive — Work | +20% Speed. Strictly worse than Swift. Use only as a placeholder. |
How to Get Better Skills via Breeding

Passive skills are inherited through breeding. Each parent can pass down up to two passive skills, allowing the offspring to inherit a maximum of four passives. Since passive inheritance is partly random, creating a perfect Anubis usually requires multiple generations of selective breeding until all desired traits are combined.
Easiest Anubis breeding combo:
Vanwyrm + Cinnamoth. Accessible before endgame and produces Anubis reliably from a Huge Rocky Egg.
Early alternative:
Penking + Bushi. Can be set up as early as player level 20 if you capture both Field Bosses.
For Legend passive:
Legend is a special passive exclusive to Alpha and Lucky Pals. Catch a wild Lucky Pal carrying Legend and breed it into your Anubis lineage. This requires multiple generations.
Condensing:
Fuse four identical Anubis copies in the Pal Condenser to push Handiwork from Lv. 4 to Lv. 5. This is worth doing after you’ve locked in your ideal passives — condensing does not affect passive skills.
Frequently Asked Questions
Does Anubis Have Handiwork?
Yes. Anubis has the highest base Handiwork suitability in the game at Level 4. No other Pal starts higher, and it can be raised to Level 5 through the Pal Condenser.
What Is Anubis’s Full Work Suitability?
Anubis has Handiwork Lv. 4, Mining Lv. 3, and Transporting Lv. 2. Having three high-level work suitabilities on one Pal is extremely rare in Palworld.
Can Anubis Learn New Skills?
Yes. Active skills can be learned through Skill Fruits found throughout the world. Passive skills can only be inherited through breeding and cannot be added directly to an existing Pal.
Are the Best Base and Combat Anubis Builds Different?
Yes. A base-focused Anubis should use Artisan + Work Slave + Lucky + Swift, while a combat-focused build should use Musclehead + Legend + Demon God + Earth Emperor. Since Musclehead reduces Work Speed by 50%, combat builds should not be assigned to base work.
Is Anubis Worth Condensing?
Absolutely. Once you’ve bred the ideal passive skills, condense duplicate Anubis to increase Handiwork from Level 4 to Level 5 while also improving its overall stats.
Which Passive Skills Are Best for Anubis?
For work, the best passives are Artisan, Work Slave, and Lucky. For combat, Musclehead, Legend, Demon God, and Earth Emperor are considered the strongest choices.
What Are the Best Combat Moves for Anubis?
The strongest combat moves include Sand Tornado, Spinning Roundhouse, and Rock Lance. Avoid using Ground Smash and Rock Lance together because their cooldowns overlap and reduce total DPS.
Is Alpha Anubis Stronger Than a Bred Anubis?
No. Wild Alpha Anubis always has the Earth Emperor passive, but a properly bred Anubis with four optimized passives performs significantly better in both combat and work efficiency.
Can Anubis Replace Other Base Workers?
For Handiwork, Anubis is the best Pal available. While Digtoise remains the stronger dedicated miner, Anubis combines excellent Handiwork and Mining, making it one of the most valuable base workers in the game.
How Do Breeding Passives Affect Anubis?
Each parent can pass up to two passive skills to its offspring. Creating a perfect four-passive Anubis usually requires multiple generations of selective breeding, with special passives like Legend introduced through Alpha or Lucky Pals.
Still have questions? Visit our Contact Us page, and we’ll be happy to help.
Gaming Musk Team creates gaming tools and practical guides for gamers. We build tools like PC requirement checkers, gamepad testers, and game-specific calculators while publishing easy-to-follow guides for games, gaming hardware, and performance optimization. Our goal is to help players make better gaming decisions with accurate tools and reliable information.
Grow a Garden Pet Guide: Find Best Pets, Skills & Tier List
Your farm earns Sheckles while you’re online. Your pets earn them while you’re asleep. That’s the core reason pets matter in Grow a Garden. Once placed into an active slot, every pet runs its ability automatically, applying crop mutations, generating XP, duplicating fruits, and cutting cooldown timers without any input from you.
This Grow a Garden Pet Guide explains everything you need to know before building your team. Not all pets are equal, and a bad lineup can mean weeks of slow progress. You’ll learn how pets work, how to get them, every rarity tier, the XP and hunger system, multipliers, cooldown reduction, and which pets are worth your time right now.
What Are Pets in Grow a Garden?
Pets are companions you place in your active garden slots. From the moment they’re placed and fed, they work in the background no clicking, no manual triggering.
The system launched with Update 1.04.0 on May 3, 2025, and has grown into one of the most important mechanics in the game. As of June 2026, there are 358+ obtainable pets across seven rarity tiers, with new pets added in nearly every major update.
Active vs. Passive Abilities
Every pet ability falls into one of two types:
Passive abilities
Run continuously with no cooldown. The Starfish generating XP every second is the clearest example. The Capybara preventing nearby pets from losing hunger is another. As long as the pet is in an active slot and its hunger bar is above zero, the passive never stops.
Active abilities
Fire on their own internal cooldown timer. The pet performs its ability, waits out the cooldown, then fires again — all automatically. T-Rex applying mutations every 3-4 minutes is a classic active example.
Pet Slots
Players start with 3 active pet slots.
Slots can be expanded by purchasing gamepasses, trading aged pets to the Raphael NPC, or completing Ascension upgrades.
Maximum active slots: up to 8 for most players.
Pet inventory holds up to 60 pets by default, expandable to 285 total through Pouches and Garden Ascension upgrades.
Hunger System
A pet’s hunger bar controls everything. The moment hunger hits 0%, XP gain stops and abilities no longer trigger. Hunger drains continuously — a full bar lasts approximately 12 hours under normal conditions.
To feed a pet: equip any harvested crop, walk up to the pet, and press Feed or use the Pet Menu (the << button on the right side of your screen) to feed without chasing your pets around the garden.
Tip: Larger, higher-rarity fruits restore significantly more hunger per feeding than common ones. Feed with Burning Buds or Sugar Apples before logging off to keep progress running overnight.
Pet Weight
Weight is the core power stat. Every pet has a starting weight assigned at hatch (0.88-2.20 kg for egg hatches; 0.88-1.32 kg for shop pets). As the pet ages, its weight increases and higher weight means stronger abilities, faster cooldowns, and better mutation rates.
There is a 1-in-1,000 chance (0.1%) for a pet to hatch as Huge, applying a x4 multiplier to its starting weight. Huge pets are among the most valuable in the trading market.
How to Get Pets (Eggs, Events & Shop)
There are four main ways to obtain pets:
Hatching Eggs The primary method. Buy eggs from the Egg Shop, place them in your garden, and wait for them to hatch. Different egg types have different rarity pools and drop rates. The Bug Egg, for example, carries a 1% chance at Dragonfly — one of the best income pets available.
Limited-Time Events Events like Bizzy Bees 2026, Summer Camp, and seasonal holidays introduce exclusive pets. Event pets are often the strongest in their rarity tier and become unavailable once the event ends. Always participate early.
Trading Players trade pets directly. The trading market (tracked on community hubs like TradeKitsune) is the only way to obtain unobtainable event pets or high-weight Godly-class animals.
Shops, Chests & Rewards Certain NPC shops sell pets for Sheckles or event currency. Some in-game chests and milestone rewards also grant pets directly.
Tip for new players: Start with the Bug Egg. It has a strong mid-tier pull pool and gives you a realistic shot at Dragonfly without needing event currency.
Pet Rarities Explained
Rarity determines how often a pet appears in egg hatches. Higher rarity generally means stronger abilities — but not always. The Dragonfly is a Divine-rarity pet with a 1% Bug Egg drop rate that outperforms many Mythical pets in practical farming.
As of the Valentine’s 2026 update, Prismatic is the highest rarity tier in the game.
| Rarity | Color | Typical Drop Rate | Primary Source |
| Common | Grey | 40–60% | Basic Egg |
| Uncommon | Green | 20–35% | Basic / Premium Egg |
| Rare | Blue | 5–15% | Premium Egg |
| Legendary | Purple | 1–9% | Premium / Event Egg |
| Mythical | Orange | 0.5–3% | Special / Event Egg |
| Divine | Gold | 0.1–1% | Event Egg / Rare Chest |
| Prismatic | Rainbow | <0.1% | Zen Egg / Special Event |
Important: Rarity is not the same as value. Community trade rankings (T0-T7) are based on ability impact and demand — not rarity label. A Common Capybara can outperform a Legendary pet in the right loadout.
Pet Levels XP, Hunger & How to Level Fast
Pets do not have a traditional level number. Instead, they have an age that increases as they accumulate XP. Ability strength, weight, and cooldown speed all scale with age.
The XP Formula
Pet XP requirements are not linear they scale exponentially. The verified in-game formula is approximately:
XP per age level = floor(20 × N2.02)
Where N is the target age. In practice:
Age 1 to Age 2 costs very little XP.
Age 99 to Age 100 costs approximately 226,665 XP.
Plan your leveling in milestones: 0–50 (unlocks pet mutations), then 50–75, then 75–100.
Try our Grow a Garden tools to plan your best pet team.
How to Level Pets Faster
| Method | XP Boost | Notes |
| Capybara | ~3.5 XP/sec to nearby pets | Also prevents hunger drain — highest priority pickup. |
| Starfish | ~6.82 XP/sec (self-only) | Best passive self-leveler in the game. |
| Blood Owl | +0.53 XP/sec to active pets | Stack up to 3 different Owl variants. |
| Night Owl | +0.20 XP/sec to nearby pets | Cost-effective early game. |
| Sea Turtle | ~1,030 bonus XP every 10 min | Random pet per trigger. |
| Medium Treat | One-time XP boost | Buy from Gear Shop. |
| Levelup Lollipop | Adds +1 age instantly | Buy from Gear Shop. |
The most efficient passive setup is Capybara + Starfish. Capybara prevents hunger drain in its radius, and Starfish generates XP at the highest passive rate in the game meaning both pets level with minimal player input
Feeding Strategy
-
Feed with large fruits (Burning Bud, Sugar Apple) before logging off
Mutated crops restore more hunger than base crops
Use the Pet Menu (<< button) to feed without moving through the garden
The Capybara makes hunger management in its radius nearly automatic
Pet Abilities and Passives How They Work

Every ability in Grow a Garden falls into one of four practical categories:
Mutation Pets
Apply a value-multiplying mutation to nearby fruits. This is the highest-ceiling category. Examples: Dragonfly (Golden, ~5 min timer), T-Rex (random mutation, 3-4 min), Butterfly (Rainbow x50), Disco Bee (Disco x125), Kitsune (Chakra x5 or Foxfire Chakra x90).
XP Boost Pets
Increase the XP generation rate for active pets. Stacking multiple Owl variants alongside a Capybara is the standard leveling meta.
Cooldown Reduction Pets
Trigger other pets’ abilities more frequently. Empress Bee resets all pet cooldowns at once. Dilophosaurus spits venom that advances individual pet cooldowns by ~92 seconds per hit.
Support Pets
Utility abilities that assist farming without directly applying mutations. Capybara (hunger prevention + XP), Chimpanzee (auto-sells fruits), Flamingo (crop growth speed), Raccoon (duplicates fruits from other players).
Do Abilities Stack?
Yes with conditions:
Passive percentage multipliers (hatch speed from Chicken, Rooster) stack additively
Mutation multipliers from different mutation types stack multiplicatively Kitsune Chakra and Dragonfly Gold on the same crop multiply together, not add together
Active ability timers run independently per pet each Raccoon runs its own visit cycle
Pet Multipliers What They Are and How to Stack Them
A multiplier is a value modifier applied to a crop. A fruit worth 1,000 Sheckles with a x50 Rainbow mutation sells for 50,000 Sheckles. Stack multiple mutations on the same crop and the numbers compound.
Key Multiplier Pets
| Pet | Mutation | Multiplier | Rarity |
| Kitsune | Foxfire Chakra | x90 | Prismatic |
| Corrupted Kitsune | Corrupt Foxfire Chakra | x90 | Prismatic |
| Kitsune + Corrupted Kitsune (combo) | Harmonized Foxfire Chakra | x190 | Both required |
| Disco Bee | Disco | x125 | Divine |
| Butterfly | Rainbow | x50 | Legendary |
| Golden Goose | Fortune | x50 | Divine |
| Dragonfly | Golden | ~x5 | Divine |
How Stacking Works
Mutation pets that apply different mutation types stack multiplicatively. If Kitsune applies Chakra (x5) and Dragonfly applies Golden to the same fruit, the result is not x6 the multipliers layer on top of each other for a significantly higher final value.
The highest possible single-crop multiplier comes from running both Kitsune and Corrupted Kitsune in the same garden simultaneously, creating Harmonized Foxfire Chakra at x190.
Rule of thumb: Build for different mutation types, not duplicate pets with the same ability, unless the ability explicitly benefits from stacking (like Raccoon’s independent duplication cycle).
Cooldown Pets Which Pets Reduce Cooldown
Cooldown reduction pets let your active-ability pets fire more often. One Empress Bee in your lineup effectively doubles or triples the output of every mutation pet alongside it.
| Pet | Cooldown Effect | Rarity | How to Obtain |
| Empress Bee | Resets ALL equipped pet cooldowns simultaneously | Divine | Bizzy Bees Event |
| Queen Bee | Resets the longest-waiting pet’s cooldown | Divine | Anti Bee Egg (event) |
| Dilophosaurus | Advances individual pet cooldown by ~92 sec per venom hit | Legendary | Premium Egg |
| Fortune Squirrel | Target pet performs ability ~3x in a row | Rare | Basic Egg |
| Chinchilla | Target pet performs ability ~3x in a row | Rare | Basic Egg |
| Meerkat | Reduces cooldown of a random pet in garden | Uncommon | Basic Egg |
Empress Bee is the strongest cooldown pet in the game by a wide margin. It carries 250,000 hunger, a permanent Upgrade Tree, and resets every active pet cooldown at once effectively multiplying the output of your entire mutation lineup.
Best Pets for Farming
Mutation Farming (Highest Sheckle Ceiling)
Prismatic
-
Kitsune Only pet with access to Foxfire Chakra (x90). T0 on community trade rankings. Obtainable via Zen Egg at very low rate or through trading.
Divine
-
Empress Bee Resets all pet cooldowns. Amplifies every active mutation pet in your loadout.
Disco Bee Only source of Disco mutation (x125). Fires every ~15 minutes.
Dragonfly Golden mutation every ~5 minutes. Consistent, reliable, widely accessible via Bug Egg.
Legendary
-
T-Rex + Spinosaurus (combo) T-Rex applies random mutations to 3 nearby fruits. Spinosaurus spreads those mutations further. Run both for a mutation pipeline.
Butterfly Rainbow mutation (x50) on a reliable timer.
XP Farming
-
Capybara Prevents hunger drain, adds ~3.5 XP/sec to nearby pets. Stack 2-3 for a near-AFK leveling setup.
Starfish 6.82 XP/sec passive, self-only. Best solo leveler.
Blood Owl / Night Owl / Cooked Owl — Run one of each for additive XP coverage without wasting stacking benefit.
Best for Beginners
Owl Passive XP, no strategy required, easy to obtain
Chicken / Rooster Hatch speed boost to get more pets from eggs faster
Raccoon Duplicates fruits from other players’ gardens every ~15 minutes. Obtainable and immediately valuable
All Pets Quick Reference Table
| Pet | Rarity | Ability Summary | Key Multiplier | Notes |
| Kitsune | Prismatic | Copies fruit + applies Chakra or Foxfire Chakra | x5 / x90 | T0 trade tier |
| Corrupted Kitsune | Prismatic | 9 fruits get Corrupt Chakra/Foxfire | x90 | Pairs with Kitsune for x190 |
| Empress Bee | Divine | Resets ALL pet cooldowns | — | Best support pet |
| Disco Bee | Divine | Applies Disco mutation | x125 | Only Disco source |
| Dragonfly | Divine | Golden mutation every ~5 min | ~x5 | Bug Egg (1% rate) |
| Butterfly | Legendary | Rainbow mutation | x50 | Anti Bee Egg |
| Golden Goose | Divine | Fortune mutation every ~13 min | x50 | Consistent income |
| T-Rex | Legendary | Random mutation to 3 fruits, 3–4 min timer | Varies | Pair with Spinosaurus |
| Spinosaurus | Legendary | Spreads mutations from one fruit to others | — | Pairs with T-Rex |
| Capybara | Common | Prevents hunger + ~3.5 XP/sec nearby | — | Best leveling support |
| Raccoon | Rare | Duplicates another player’s fruit | — | Strong consistent income |
| Starfish | Common | ~6.82 XP/sec passive (self) | — | Best solo leveler |
| Mimic Octopus | Mythical | Copies a nearby pet’s ability every ~20 min | — | Versatile mid-game pick |
Frequently Asked Questions
What is the max level for pets in Grow a Garden?
There is no hard level cap. Pets age indefinitely the XP requirement simply grows exponentially with each level. Most players target Age 50 first (which unlocks the Pet Mutation Machine) then continue toward Age 100. The jump from Age 99 to Age 100 alone costs approximately 226,665 XP.
Which pet gives the best multiplier?
Running both Kitsune and Corrupted Kitsune simultaneously creates the Harmonized Foxfire Chakra mutation at x190 — the highest single crop multiplier in the game. For players who can’t access Kitsune, Disco Bee (x125) and Butterfly (x50) are the next best options.
How do you get rare pets?
Hatch Premium or event-specific eggs, participate in every limited-time event before it closes, and trade with other players. The Panda the rarest pet by population is only obtainable through trading, as it was given away during a 60-minute window at the game’s launch in May 2025 and has never returned.
Which pets reduce cooldown?
The top cooldown reduction pets are Empress Bee (resets all cooldowns at once), Queen Bee (resets the single longest-waiting pet), and Dilophosaurus (advances individual cooldowns by ~92 seconds per venom hit).
How do pet multipliers stack?
Passive percentage multipliers (like hatch speed from Chicken and Rooster) stack additively. Value mutation multipliers from different mutation types stack multiplicatively meaning Chakra and Golden on the same crop multiply together, not add. This is why mixing mutation types outperforms running duplicates of the same pet.
What is the rarest pet?
Kitsune holds the T0 Apex trade tier the highest ranking across 180,000+ community trades and is considered the rarest obtainable pet. By population count, the Panda is arguably scarcer, having only been available during a single 60-minute window in May 2025.
Do pets carry over between resets?
Yes. Pets remain in your inventory across normal sessions. Pets continue aging offline as long as their hunger bar is not empty. Check patch notes for any event-specific rules, but standard gameplay resets do not affect pet progress.
How do I evolve (mutate) my pet?
Bring a pet aged 50 or higher to the Pet Mutation Machine near the Egg Shop and pay 500,000,000 Sheckles. The mutation process takes 1 hour and resets the pet’s age to 1 but grants a permanent mutation and new ability. You can skip the wait for 49 Robux. Note: mutations don’t stack placing a mutated pet back in the machine will overwrite the existing mutation. The exception is pets with a natural Rainbow mutation from Rainbow Eggs, which can stack with a machine mutation.
Still have questions? Visit our Contact Us page, and we’ll be happy to help.
Gaming Musk Team creates gaming tools and practical guides for gamers. We build tools like PC requirement checkers, gamepad testers, and game-specific calculators while publishing easy-to-follow guides for games, gaming hardware, and performance optimization. Our goal is to help players make better gaming decisions with accurate tools and reliable information.